The HD video function of DSLRs such as the Canon 7D has sparked a renewed interest in low budget film and video making. This has led to an explosion of lower-budget video cameras being produced using similar technology. So if you’ve started in still photography or basic DSLR video shooting, what do you need to know when progressing on to cameras (such as our inhouse cameras, the Sony FS100) which have been designed specifically for video capture? This article will cover the various differences between the mediums and allow you to make the hop up to broadcast quality video.
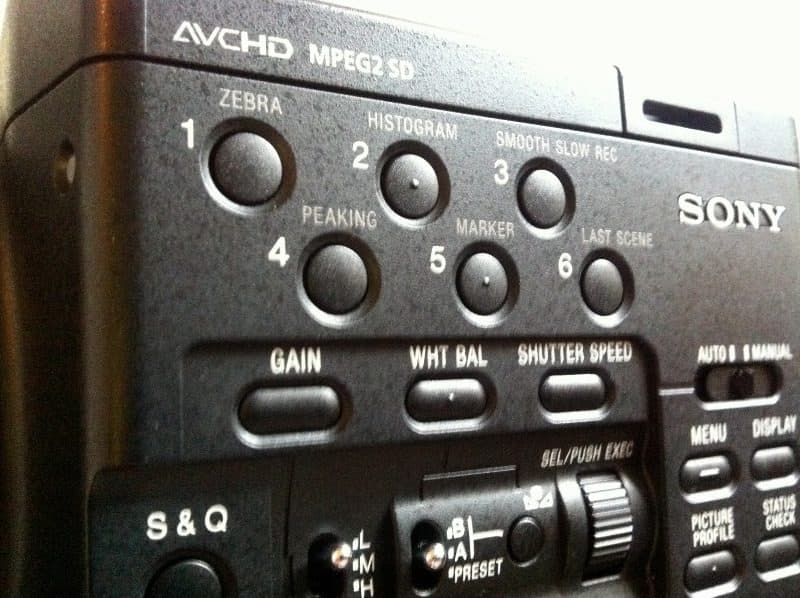
Gain vs ISO
Gain and ISO are essentially different scales for the same thing (think fahrenheit vs centigrade).
ISO (also known as ASA) was used with photographic film to donate the speed of negative photographic materials. With DSLRs the ISO is an equivalent that refers to how sensitive the sensor is to the amount of light. A higher ISO means more sensitivity therefore you can see more with less light.
Gain is the same thing, an electronic amplification of the video signal, and was incorporated into camcorders before stills cameras became digital. Voltage is added to your sensor and is measured in decibels (dB).
The important thing to note, whether you’re calling it ISO or Gain is that their use introduces noise into your video, which is especially problematic when doing a lot of post production work, including grading.
White Balance
Purpose built video cameras often have more variable white balance, and often black balance, settings. As well as auto functions, you can manually set the white balance by shooting at a white subject (as with most DSLRs), but you can also dial in what Kelvin setting you want, which is great if say you want the image a bit warmer (though make sure your monitor is set correctly if judging by eye).
Shutter Speed
By setting a video camera to a “normal” shutter speed of 1/60th second (the time it takes to scan one video field in the NTSC standard), the electronic sampling is done at the maximum time allowed by the field rate of the TV system. This represents the maximum exposure possible with normal sampling. Changing the shutter speed when shooting video is useful in a number of situations. When filming computer screens or under certain lights you can adjust the shutter speed to reduce any flickering that may occur. When recording time-lapse you may also want to reduce the shutter speed to add some motion blur. When shooting slow motion you may want to increase the shutter speed to get sharper images (reduced motion blur).
XLR inputs
Simply put camcorders have much greater functionality when recording sound. Most DSLRs still require an add-on to enable you to control the audio levels being recorded by the camera. Camcorders generally come with two XLR inputs as well as an onboard mic. As well as controlling the levels these inputs are normally switchable between ‘Line;, ‘Mic’, and Mic +48v. You will also be able to control which mic input gets recorded to which of the two audio channels as well as being able to monitor each channel individually or as a ‘mix’
Zebra
Basically this shows (with a striped ‘zebra’ pattern’) areas of the picture that are overexposed. There are two types of Zebra, 100 IRE or adjustable 70-90 IRE. With 70-90 IRE the Zebra pattern appears on highlights between 70 and 90 IRE, depending on how you set up the camcorder. IRE was labelled as such by the Institute of Radio Engineers and represents the composite video signal in terms of a percentage. 70-90 IRE is generally of use when filming interviews as you’d look to get some zebra patterning on the cheeks, forehead and nose.
With 100 IRE the zebra pattern shows any areas of the image that exceed 100 IRE which is the limit of legal (broadcast) video. Therefore when using this you adjust your exposure until the zebra patterning just disappears. These days many video cameras come with built in wave form monitors which can help with managing highlights.
Peaking
Peaking is a monitor function that shows you the areas of your video that have the greatest sharpness. This aids focusing and with the increased use of dramatic shallow depth of field shots is a vital tool to using these large sensor cameras.
Area Safe modes or ‘Guides’
Nowadays it’s easy to film in any aspect ratio, upload it to YouTube and job done – people will be able to watch your video. But what if you’re progressing to filming commercials or programmes fit for TV broadcast. Commercials are still not yet broadcast in this country in 16:9 aspect ratio, although this is the normal for anyone shooting almost anything these days. This is where the Area safe mode on your camcorder monitor becomes vital. It’ll put lines on the monitor that aren’t recorded or ‘burned in’ to the video that show which of the image is in 4:3, or 16:9. There are also often options as to the ratio of guide lines you want to use if any giving you control over your shooting requirements.
Camcorder monitor showing 4:3 guide lines as well as 70 IRE zebra patterning which gives highlights on the face of the model.
Detail of image with bottom half with 30db gain, you see more detail in the shadows but you get more grain or artefacts which become a problem if doing a lot of post production work such as grading.
To conclude, DLSRs have done wonders over the last few years for video capture, however there are limitations which can be overcome by switching to modern quality camcorders for video. This article has covered a few elements which will hopefully facilitate the change!